Blog Entry
Using Serial Peripheral Interface (SPI) Master and Slave with Atmel AVR Microcontroller
June 25, 2009 by rwb, under Microcontroller.
Sometimes we need to extend or add more I/O ports to our microcontroller based project. Because usually we only have a limited I/O port left than the logical choice is to use the serial data transfer method; which usually only requires from one up to four ports for doing the data transfer. Currently there are few types of modern embedded system serial data transfer interface widely supported by most of the chip’s manufactures such as I2C (read as I square C), SPI (Serial Peripheral Interface), 1-Wire (One Wire), Controller Area Network (CAN), USB (Universal Serial Bus) and the RS-232 families (RS-423, RS-422 and RS-485). The last three interface types is used for long connection between the microcontroller and the devices, up to 1200 meters for the RS-485 specification, while the first three is used for short range connection.
Among these serial data transfer interface types, SPI is considered the fastest synchronous with full duplex serial data transfer interface and can be clocked up to 10 MHz; that is why it is widely used as the interface method to the high speed demand peripheral such as the Microchip Ethernet controller ENC28J60, Multi Media Card (MMC) Flash Memory, Microchip SPI I/O MCP23S17, Microchip 128K SPI EEPROM 25AA128, ADC, sensors, etc.
In this tutorial we will learn how to utilize the Atmel AVR ATMega168 SPI peripheral to expand the ATMega168 I/O ports and to communicate between two microcontrollers with the SPI peripheral where one microcontroller is configured as a master and other as a slave. The principal we learn here could be applied to other types of microcontroller families.
Serial Peripheral Interface (SPI)
The standard Serial Peripheral Interface uses a minimum of three line ports for communicating with a single SPI device (SPI slave), with the chip select pin (CS) is being always connected to the ground (enable). If more the one SPI devices is connected to the same bus, then we need four ports and use the fourth port (SS pin on the ATMega168 microcontroller) to select the target SPI device before starting to communicate with it.


If more then three SPI slave devices, then it is better to use from three to eight channels decoder chip such as 74HC138 families. Since the SPI protocol uses full duplex synchronous serial data transfer method, it could transfer the data and at the same time receiving the slave data using its internal shift register.

From the SPI master and slave interconnection diagram above you could see that the SPI peripheral use the shift register to transfer and receive the data, for example the master want to transfer 0b10001101 (0x8E) to the slave and at the same time the slave device also want to transfer the 0b00110010 (0x32) data to the master. By activating the CS (chip select) pin on the slave device, now the slave is ready to receive the data. On the first clock cycle both master and slave shift register will shift their registers content one bit to the left; the SPI slave will receive the first bit from the master on its LSB register while at he same time the SPI master will receive its first data from slave on its LSB register.

Continuously using the same principal for each bit, the complete data transfer between master and slave will be done in 8 clock cycle. By using the highest possible clock allowed such as the Microchip MCP23S17 SPI slave I/O device (10 MHz) than the complete data transfer between the microcontroller and this SPI I/O port could be achieve in 0.8 us. As you understand how the SPI principal works, now its time to implement it with the Atmel AVR ATMega168 microcontroller.
The following is the list of hardware and software used in this project:
- 74HC595, 8-bit shift registers with output latch
- Microchip MCP23S17 16-bit SPI I/O Expander
- Resistor: 330 Ohm (8), 10K (1)
- Eight 3 mm blue LED
- One micro switch
- AVRJazz Mega168 board from ermicro which base on the AVR ATmega168 microcontroller (board schema).
- WinAVR for the GNU’s C compiler
- Atmel AVR Studio 4 for the coding and debugging environment
- STK500 programmer from AVR Studio 4, using the AVRJazz Mega168 board STK500 v2.0 bootloader facility.
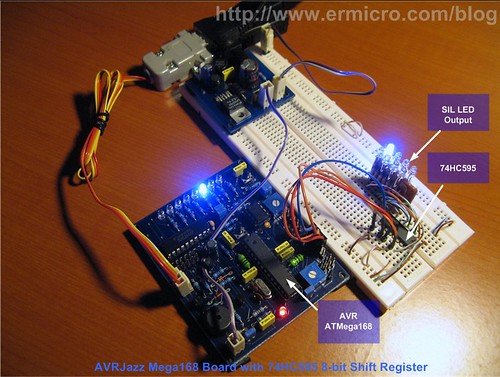
Expanding Output Port with 74HC595 8-bit Shift Registers
Because the basic operation of SPI peripheral is a shift register, then we could simply use the 8-bit shift register with output latch to expand the output port. The 16 pins 74HC595 families could be use to serve this purpose.

The 74HC595 device has 8-bit serial-in, parallel-out shift register that feeds directly to the 8-bit D-type storage register. The 8-bit serial-in shift register has its own input clock pin named SCK, while the D-Latch 8-bit registers use pin named RCK for transferring (latching) the 8-bit shift registers output to D-Latch output registers.
In normal operation according to the truth table above the 74HC595 shift registers clear pin (SCLR) should be put on logical high and the 8-bit D-Latch buffer output enable pin (G) should be put on logical low. By feeding the serial input pin (SER) with AVR ATMega168 master out slave in pin (MOSI) and connecting the master synchronous clock (SCK) to the 74HC595 shift registers clock (SCK), we could simply use the 74HC595 as the SPI slave device. Optionally we could connect the 74HC595 Q’H output pin (shift registers MSB bit) to the master in slave out pin (MISO); this optional connection will simply returns the previous value of the shift registers to the SPI master register.

Now let’s take a look to the C code for sending simple chaser LED display to the 74HC595 output:
/*****************************************************************************
//  File Name    : avrspi.c
//  Version      : 1.0
//  Description  : SPI I/O Using 74HC595 8-bit shift registers
//                 with output latch
//  Author       : RWB
//  Target       : AVRJazz Mega168 Board
//  Compiler     : AVR-GCC 4.3.0; avr-libc 1.6.2 (WinAVR 20080610)
//  IDE          : Atmel AVR Studio 4.14
//  Programmer   : AVRJazz Mega168 STK500 v2.0 Bootloader
//               : AVR Visual Studio 4.14, STK500 programmer
//  Last Updated : 28 May 2009
*****************************************************************************/
#include <avr/io.h>
#include <util/delay.h>
#define SPI_PORT PORTB
#define SPI_DDR  DDRB
#define SPI_CS   PB2
unsigned char SPI_WriteRead(unsigned char dataout)
{
  unsigned char datain;
  // Start transmission (MOSI)
  SPDR = dataout;
  // Wait for transmission complete
  while(!(SPSR & (1<<SPIF)));
  // Get return Value;
  datain = SPDR;
  // Latch the Output using rising pulse to the RCK Pin
  SPI_PORT |= (1<<SPI_CS);
_delay_us(1); // Hold pulse for 1 micro second
  // Disable Latch
  SPI_PORT &= ~(1<<SPI_CS);
  // Return Serial In Value (MISO)
  return datain;
}
int main(void)
{
  unsigned char cnt;
  // Set the PORTD as Output:
  DDRD=0xFF;
  PORTD=0x00;

  // Initial the AVR ATMega168 SPI Peripheral
  // Set MOSI and SCK as output, others as input
  SPI_DDR = (1<<PB3)|(1<<PB5)|(1<<PB2);
  // Latch Disable (RCK Low)
  SPI_PORT &= ~(1<<SPI_CS);
  // Enable SPI, Master, set clock rate fck/2 (maximum)
  SPCR = (1<<SPE)|(1<<MSTR);
  SPSR = (1<<SPI2X);
  // Reset the 74HC595 register
  cnt=SPI_WriteRead(0);

  for(;;) {
    cnt=1;
    while(cnt) {
	  cnt=cnt<<1;
	  PORTD=SPI_WriteRead(cnt);
	  _delay_ms(100);
	}
	cnt=0x80;
	while(cnt) {
	  cnt=cnt>>1;
	  PORTD=SPI_WriteRead(cnt);
	  _delay_ms(100);
	}
  }
  return 0;
}
/* EOF: avrspi.c */
AVR Serial Peripheral Interface
The principal operation of the SPI is simple but rather then to create our own bit-bang algorithm to send the data, the build in SPI peripheral inside the Atmel AVR ATMega168 microcontroller make the SPI programming become easier as we just passing our data to the SPI data register (SPDR) and let the AVR ATMega168 SPI peripheral do the job to send and read the data from the SPI slave device. To initialize the SPI peripheral inside the ATMega168 microcontroller we need to enable this device for SPI master and set the master clock frequency using the SPI control register (SPCR) and SPI status register (SPST), for more information please refer to the AVR ATMega168 datasheet.

The first thing before we use the SPI peripheral is to set the SPI port for SPI master operation; MOSI (PB3) and SCK (PB5) as output port and MISO (PB4) is the input port, while the SS can be any port for SPI master operation but on this tutorial we will use the PB2 to select the SPI slave device. The following C code is used to set these SPI ports.
#define SPI_PORT PORTB
...
// Set MOSI and SCK as output, others as input
SPI_DDR = (1<<PB3)|(1<<PB5)|(1<<PB2);
After initializing the ports now we have to enable the SPI by setting the SPE (SPI enable) bit to logical “1” and selecting the SPI master operation by setting the MSTR bit to logical “1” in the SPCR register. For all other bits we just use its default value (logical “0“); such as the data order (DORD) bit for first transferring MSB, using the rising clock for the master clock on clock polarity (CPOL) bit and sampled the data on leading edge clock phase (CPHA) bit.
Because the 74HC595 shift register can receive up to 30 Mhz clock rate, then I use the fastest clock that can be generated by the ATMega168 microcontroller SPI peripheral which is fsc/2 (the AVRJazz Mega168 board using 11.059200 MHz); therefore the maximum clock generated by the SPI master will be 5.5296 MHz. This frequency can be achieved by setting the SPR1=0 and SPR0=0 in the SPCR register and SPI2X=1 in the SPSR register.
// Enable SPI, Master, set clock rate fck/2 (maximum)
SPCR = (1<<SPE)|(1<<MSTR);
SPSR = (1<<SPI2X);
Sending and reading the data is using the SPI data register (SPDT) and when the SPI Master-Slave data transfer is completed than SPIF (SPI interrupt flag) in the SPSR register will be set to logical “1“; therefore by examining this bit status we could ensure that the transmission between SPI master and slave is completed.
// Start transmission (MOSI)
SPDR = dataout;
// Wait for transmission complete
while(!(SPSR & (1<<SPIF)));
// Get return Value;
datain = SPDR;
After reading the data from the SPDT register; we have to send the latch clock to the 74HC595 D-Latch register (RCK pin) to latch the 8-bit shift registers data to its output.
#define SPI_PORT PORTB
#define SPI_DDR  DDRB
#define SPI_CS   PB2
...
// Latch the Output using rising pulse to the RCK Pin
SPI_PORT |= (1<<SPI_CS);
_delay_us(1); // Hold pulse for 1 micro second
// Disable Latch
SPI_PORT &= ~(1<<SPI_CS);
Microchip MCP23S17 SPI I/O Expander
For more advance input and output capability SPI device you could use the Microchip MCP23S17 SPI I/O Expander chip, which provide additional 16-bit I/O for your microcontroller’s based project.

With the addressable pins configuration feature (A2,A1 and A0), practically you could attach up to 8 of MCP23S17 SPI I/O expander devices which gives you 128 I/O ports using just four of your AVR ATMega168 microcontroller’s ports (MOSI, MISO, SCK and SS).

All the MCP23S17 16-bit general purpose I/O (GPIO) ports can be configured both as input or output by setting the MCP23S17 IODIRA and IODIRB I/O direction register. Each of the MCP23S17 general I/O pins could be configured to generate interrupt when the ports pin changes its state (for more information please refers to Microchip MCP23S17 datasheet).
For the purpose of this tutorial we will use the Microchip MCP23S17 just as the ordinary input and output expander for the AVR ATMega168 microcontroller.
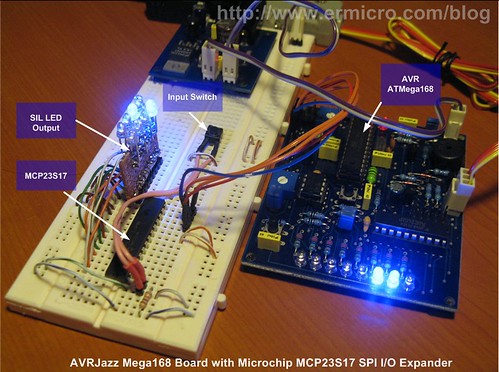

The MCP23S17 is configured to use address 0x00 (address pins A0,A1 and A2 are connected to the ground) and the push button switch connected to GPB0 port will be use as the toggle button to start and stop the chaser LED display attached to the GPA0 to GPA7 ports. The following is the C code to achieve these tasks.
/*****************************************************************************
//  File Name    : mcp23s17.c
//  Version      : 1.0
//  Description  : SPI I/O Using Microchip MCP23S17 16-Bit I/O Expander
//  Author       : RWB
//  Target       : AVRJazz Mega168 Board
//  Compiler     : AVR-GCC 4.3.0; avr-libc 1.6.2 (WinAVR 20080610)
//  IDE          : Atmel AVR Studio 4.14
//  Programmer   : AVRJazz Mega168 STK500 v2.0 Bootloader
//               : AVR Visual Studio 4.14, STK500 programmer
//  Last Updated : 28 May 2009
*****************************************************************************/
#include <avr/io.h>
#include <util/delay.h>
#define SPI_PORT PORTB
#define SPI_DDR  DDRB
#define SPI_CS   PB2
// MCP23S17 SPI Slave Device
#define SPI_SLAVE_ID    0x40
#define SPI_SLAVE_ADDR  0x00      // A2=0,A1=0,A0=0
#define SPI_SLAVE_WRITE 0x00
#define SPI_SLAVE_READ  0x01
// MCP23S17 Registers Definition for BANK=0 (default)
#define IODIRA 0x00
#define IODIRB 0x01
#define IOCONA 0x0A
#define GPPUA  0x0C
#define GPPUB  0x0D
#define GPIOA  0x12
#define GPIOB  0x13
// Define MCP23S17 Slave Emulation Mode:
//
//   0 - Real MCP23S17:
//       Only works on real Microchip MCP23S17 SPI I/O
//   1 - ATMega168 SPI Slave (MCP23S17 Emulation):
//       Both works on real MCP23S17 and ATMega168 Slave Mode
//
// ATMega168 Crystal Frequency: 11059200 Hz
//
#define MCP23S17_EMULATION 1
void SPI_Write(unsigned char addr,unsigned char data)
{
  // Activate the CS pin
  SPI_PORT &= ~(1<<SPI_CS);
  // Start MCP23S17 OpCode transmission
  SPDR = SPI_SLAVE_ID | ((SPI_SLAVE_ADDR << 1) & 0x0E)| SPI_SLAVE_WRITE;
  // Wait for transmission complete
  while(!(SPSR & (1<<SPIF)));
  // Start MCP23S17 Register Address transmission
  SPDR = addr;
  // Wait for transmission complete
  while(!(SPSR & (1<<SPIF)));

  // Start Data transmission
  SPDR = data;
  // Wait for transmission complete
  while(!(SPSR & (1<<SPIF)));
  // CS pin is not active
  SPI_PORT |= (1<<SPI_CS);
}
unsigned char SPI_Read(unsigned char addr)
{
  // Activate the CS pin
  SPI_PORT &= ~(1<<SPI_CS);
  // Start MCP23S17 OpCode transmission
  SPDR = SPI_SLAVE_ID | ((SPI_SLAVE_ADDR << 1) & 0x0E)| SPI_SLAVE_READ;
  // Wait for transmission complete
  while(!(SPSR & (1<<SPIF)));
#if MCP23S17_EMULATION
  _delay_us(1);
#endif
  // Start MCP23S17 Address transmission
  SPDR = addr;
  // Wait for transmission complete
  while(!(SPSR & (1<<SPIF)));

#if MCP23S17_EMULATION
  _delay_us(1);
#endif
  // Send Dummy transmission for reading the data
  SPDR = 0x00;
  // Wait for transmission complete
  while(!(SPSR & (1<<SPIF)));

  // CS pin is not active
  SPI_PORT |= (1<<SPI_CS);
  return(SPDR);
}
int main(void)
{
  unsigned char cnt,togbutton,inp;
  unsigned int idelay;
  char pattern[32]= {0b00000001,
   		     0b00000011,
		     0b00000110,
	  	     0b00001100,
		     0b00011001,
		     0b00110011,
		     0b01100110,
		     0b11001100,
		     0b10011000,
		     0b00110000,
		     0b01100000,
		     0b11000000,
		     0b10000000,
		     0b00000000,
		     0b00000000,
		     0b00000000,
		     0b10000000,
		     0b11000000,
		     0b01100000,
		     0b00110000,
		     0b10011000,
		     0b11001100,
		     0b01100110,
		     0b00110011,
		     0b00011001,
		     0b00001100,
		     0b00000110,
		     0b00000011,
		     0b00000001,
		     0b00000000,
		     0b00000000,
		     0b00000000,
		    };
  // Set the PORTD as Output:
  DDRD=0xFF;
  PORTD=0x00;
  // Initial ATMega168 ADC Peripheral for User's Trimpot Input on PC0
  DDRC &= ~(1<<PC0);

  ADCSRA = (1<<ADEN) | (1<<ADPS2) | (1<<ADPS1);
  // Free running Mode
  ADCSRB = 0x00;
  // Disable digital input on ADC0 (PC0)
  DIDR0 = 0x01;
  ADMUX=0x00;	               // Select Channel 0 (PC0)

  // Initial the AVR ATMega168 SPI Peripheral
  // Set MOSI (PB3),SCK (PB5) and PB2 (SS) as output, others as input
  SPI_DDR = (1<<PB3)|(1<<PB5)|(1<<PB2);
  // CS pin is not active
  SPI_PORT |= (1<<SPI_CS);
#if MCP23S17_EMULATION
  // Enable SPI, Master, set clock rate fck/64
  SPCR = (1<<SPE)|(1<<MSTR)|(1<<SPR1);
#else
  // Enable SPI, Master, set clock rate fck/2
  SPCR = (1<<SPE)|(1<<MSTR);
  SPSR |= (1<<SPI2X);
#endif
  // Initial the MCP23S17 SPI I/O Expander
  SPI_Write(IOCONA,0x28);   // I/O Control Register: BANK=0, SEQOP=1, HAEN=1 (Enable Addressing)
  SPI_Write(IODIRA,0x00);   // GPIOA As Output
  SPI_Write(IODIRB,0xFF);   // GPIOB As Input
  SPI_Write(GPPUB,0xFF);    // Enable Pull-up Resistor on GPIOB
  SPI_Write(GPIOA,0x00);    // Reset Output on GPIOA
  togbutton=0;              // Toggle Button
  cnt=0;
  idelay=100;               // Default Delay;

  for(;;) {
    inp=SPI_Read(GPIOB);    // Read from GPIOB
	if (inp == 0xFE) {      // Button is pressed
	  _delay_ms(1);

	  inp=SPI_Read(GPIOB);  // Read from GPIOB, for simple debounce
	  if (inp == 0xFE) togbutton^=0x01;
	  if (togbutton == 0x00) {
	    SPI_Write(GPIOA,0x00);         // Write to MCP23S17 GPIOA
	    PORTD=0x00;                    // Write to PORTD
	    cnt=0;
      }
	}

	if (togbutton) {
	  // Start conversion by setting ADSC on ADCSRA Register
	  ADCSRA |= (1<<ADSC);
	  // wait until convertion complete ADSC=0 -> Complete
      while (ADCSRA & (1<<ADSC));
	  // Get the ADC Result
	  idelay = ADCW;
	  SPI_Write(GPIOA,pattern[cnt]);   // Write to MCP23S17 GPIOA
	  PORTD=pattern[cnt++];	           // Write to PORTD
	  if (cnt >= 32) cnt=0;
    }
	_delay_ms(idelay);
  }
  return 0;
}
/* EOF: mcp23s17.c */
Unlike the 74HC595 8-bit shift register above, writing and reading to and from the MCP23S17 SPI slave must be done in three SPI master writing operation cycles. First the SPI master has to send the MCP23S17 SPI slave ID with its physical address (set by A2, A1 and A0 pins) and the read or write instruction to the MCP23S17. Secondly the SPI master has to tell MCP23S17 which one of the MCP23S17 control registers address we want to use, and the last one we send or read the actual data.

From the MCP23S17 SPI addressing diagram above you could see that at least we need to perform three SPI master writing to send or read the data to or from the MCP23S17 SPI slave I/O expander. Using the same principal we’ve learned from the 74HC595 to send the data we simply supply the correct data to the ATMega168 microcontroller SPDR register while keep the SS (PB2) pin low to enable the MCP23S17 SPI slave device. After all data has been sent or read then we raise (logical “1“) the SS (PB2) pin to deactivate the SPI slave device.
The SPI_Write() and the SPI_Read() function are used to do the write and read to and from the MCP23S17 SPI slave. As you’ve seen from the SPI_Read() function code above because the SPI slave could not initiate its own data transfer therefore the SPI master has to start the data transfer by sending the dummy data 0x00 to the SPI slave in order to read the SPI slave data.
...
// Send Dummy transmission for reading the data
SPDR = 0x00;
// Wait for transmission complete
while(!(SPSR & (1<<SPIF)));

// CS pin is not active
SPI_PORT |= (1<<SPI_CS);
return(SPDR);
The MCP23S17 SPI I/O expander has two general I/O ports named GPIOA and GPIOB. The default power-up condition of MCP23S17 is all I/O ports configured as an input port. By changing each of the I/O direction registers (IODIRA and IODIRB) we could change this port behavior; this pretty much the same as we set the data direction register on the ATMega168 microcontroller I/O ports. The following code shows how to initialize the MCP23S17 SPI I/O expander.
// Initial the MCP23S17 SPI I/O Expander
SPI_Write(IOCONA,0x28);  // I/O Control Register: BANK=0, SEQOP=1, HAEN=1 (Enable Addressing)
SPI_Write(IODIRA,0x00);  // GPIOA As Output
SPI_Write(IODIRB,0xFF);  // GPIOB As Input
SPI_Write(GPPUB,0xFF);   // Enable Pull-up Resistor on GPIOB
SPI_Write(GPIOA,0x00);   // Reset Output on GPIOA
By assigning the IODIRA with 0x00 and IODIRB with 0xFF, we tell MCP23S17 to assign its GPIOA ports as output and GPIOB as input. Remember this setup is different compare to the ATMega168 microcontroller data direction register, which use 0xFF for output and 0x00 for input. To make sure all the GPIOB input ports are on known state (all ports high), we activate the MCP23S17 pull-up resistors by assigning 0xFF to the GPPUB register.
To enable the MCP23S17 addressing mode, we have to enable (logical “1“) the HAEN bit on the IOCONA register. The IOCONA and IOCONB registers actually shared the same bit; therefore you could change either the IOCONA or IOCONB.

Assigning 0x28 to the IOCON register means we used the BANK = 0 addressing mode, disable the sequential address increment and we enable the address bit control on A2, A1 and A0 pins of MCP23S17 (current implementation A2=0, A1=0, and A0=0).
Inside the Infinite Loop
After configure the MCP23S17 registers, we entering the infinite loop which simple read the MCP23S17 GPIOB input port and if the switch is pressed then start sending the LED display patterns to the MCP23S17 GPIOA output port and to the ATMega168 PORTD which is also configured as the output port.
The LED display delay is controlled by the user’s trimport on the AVRJazz Mega168 board which connected to the ADC channel 0 (PC0), for further information about using the ATMega168 microcontroller ADC peripheral please refer to my previous posted blog Analog to Digital Converter AVR C Programming.
AVR ATMega168 microcontroller as the SPI Slave Device
In this last AVR SPI tutorial we will transform a second AVR ATMega168 to the SPI slave I/O device; in order not to change the SPI master demo program shown on the MCP23S17 section above, I decided to emulate some functions of the Microchip MCP23S17 SPI I/O expander using the Atmel AVR ATMega168 microcontroller and at the same time it will give us a good example of how to program the AVR ATMega168 microcontroller as the SPI slave device.
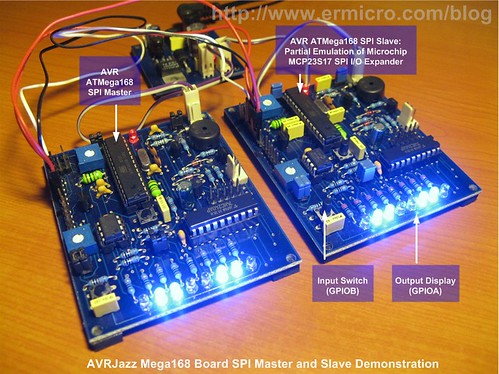

The SPI slave device practically is a passive device which means that the SPI device could not initiate the data transfer to the SPI Master. Its rely only on the SPI Master to first transfer its data then at the same time the SPI slave could transfer its own data to the SPI master. The C code bellows show how the Atmel AVR ATMega168 microcontroller being transformed to the Microchip MCP23S17 SPI I/O expander:
/*****************************************************************************
//  File Name    : avrslave.c
//  Version      : 1.0
//  Description  : SPI I/O Using ATMega168 as the SPI Slave device
//                 Partial Emulation of MCP23S17 SPI I/O Expander
//                 PORTD -> GPIOA, PORTB.PB0 -> GPIOB.GPB0
//  Author       : RWB
//  Target       : AVRJazz Mega168 Board
//  Compiler     : AVR-GCC 4.3.0; avr-libc 1.6.2 (WinAVR 20080610)
//  IDE          : Atmel AVR Studio 4.14
//  Programmer   : AVRJazz Mega168 STK500 v2.0 Bootloader
//               : AVR Visual Studio 4.14, STK500 programmer
//  Last Updated : 28 May 2009
*****************************************************************************/
#include <avr/io.h>
#include <util/delay.h>
#define SPI_PORT PORTB
#define SPI_DDR  DDRB
#define SPI_CS   PB2
// MCP23S17 Emulation Read & Write OpCode
#define MCP23S17_Write 0x40
#define MCP23S17_Read  0x41
#define IODIRA 0x00
#define IODIRB 0x01
#define IOCONA 0x0A
#define GPPUA  0x0C
#define GPPUB  0x0D
#define GPIOA  0x12
#define GPIOB  0x13
unsigned char SPI_WriteRead(unsigned char dataout)
{
  // Put Slave Data On SPDR
  SPDR=dataout;
  // Wait for transmission complete
  while(!(SPSR & (1<<SPIF)));
  // Return Serial In Value (MISO)
  return SPDR;
}
int main(void)
{
  unsigned char state,rwstat;
  unsigned char datain,dataout,slavereg;
  // MCP23S17 Registers Emulation Variables
  unsigned char iodirb;
  unsigned char gpiob;
  unsigned char iocona;
  unsigned char gppua;
  unsigned char gppub;

  // Initial the AVR ATMega168 SPI Slave Peripheral
  // Set MISO (PB4) as output, others as input
  SPI_DDR |= (1<<PB4);
  // Enable SPI as Slave
  SPCR = (1<<SPE);
  state=0;      // State: 0-ID and Address, 1-Register, 2-Data
  rwstat=0;     // 0-Read, 1-Write
  dataout=0;
  slavereg=0;

  // Reset All the MCP23S17 Slave Emulation Registers
  iocona=0;
  gppua=0;
  gppub=0;
  iodirb=0;
  gpiob=0;

  for(;;) {
        // Poll the SPI Data
	datain=SPI_WriteRead(dataout);

	// Examining the state here
	switch(state) {
	  case 0:
	    // Check for MCP23S17 Slave Emulation OpCode
	    if (datain == MCP23S17_Write) {
	      state=1;
	      rwstat=1;      // Write
	    }

	    if (datain == MCP23S17_Read) {
	      state=1;
	      rwstat=0;      // Read
	    }
	    break;
          case 1:
	    // For MCP23S17 implemented register, change the state
	    if (datain == IODIRA || datain == IODIRB || datain == IOCONA || datain == GPPUA ||
	        datain == GPPUB || datain == GPIOA || datain == GPIOB) {

              slavereg=datain;
	      state=2;
              // For Read Condition then prepare for returning value on the next master cycle
	      if (!rwstat) {
		dataout=0x00;

  		switch(slavereg) {
		  case IODIRA:
		    dataout=~DDRD;
		    break;
                 case IODIRB:
		    dataout=iodirb;
		    break;
		 case GPIOA:
		    dataout=PIND;
                    break;
                 case GPIOB:
		    if (bit_is_clear(PINB, PB0)) {
		      dataout=0xFE;
		    }
                    break;
		}
	     }
            }
	    break;
	  case 2:
	    if (rwstat) {
	      // Write
	      switch(slavereg) {
	        case IODIRA:
	          // Complement Data, ATMega168 DDR use "1" for Output Data Direction
		  DDRD=~datain;
		  break;
                case IODIRB:
		  iodirb=datain & 0x01;  // Just put it on variable
		  if (iodirb == 0x01) {
		    // Only for input PB0, ignore output and other ports
		    DDRB &= ~(1 << PB0);
		  }
		  break;
                case IOCONA:
		  iocona=datain;  // Just put it on variable
		  break;
                case GPPUA:
		  gppua=datain;   // Just put it on variable
		  break;
               case GPPUB:
		  gppub=datain;   // Just put it on variable
		  break;
	       case GPIOA:
		  PORTD=datain;   // Passing data to the real port
                  break;
               case GPIOB:
		  gpiob=datain;   // Passing data to the emulation register
                  break;
             }
	     dataout=0;
	    }
	    state=0;
	    rwstat=0;
	    break;
    }
  }
  return 0;
}
/* EOF: avrslave.c */
The ATMega168 microcontroller SPI slave initiation can be done by simply enabling the MISO port (PB4) as the output port and enabling the SPI peripheral bit SPE (logical “1“) in the SPCR register. By polling the SPDR register using the SPI_WriteRead() function we could examine the data send by the SPI Master using the state condition algorithm to emulate the Microchip MCP23S17 SPI I/O expander partial functionality as shown inside the infinite loop code.

- The first state cycle checks if the SPI master is sending the MCP23S17 ID (0100) and the address (currently implemented as 000) and examines if this is READ (1) or WRITE (0) operation code.
- The second state cycle check for implemented MCP23S17 control registers (IODIRA ,IODIRB,IOCONA,GPPUA,GPPUB,GPIOA, and GPIOB) and at the same time prepares the data to be sent to the SPI Master on the next SPI master cycle if this is the READ operation
- The third state cycle (final state) send the SPI slave data to the SPI master, executes the WRITE operation using the last data sent by the SPI master to the MCP23S17 emulated registers and resets the state cycle variables for the next new SPI master command.
If you notice in the SPI master code above (MCP23S17 section), I include the #define MCP23S17_EMULATION 1 compiler directive; which give slightly different code when it turn off (#define MCP23S17_EMULATION 0).
#if MCP23S17_EMULATION
  // Enable SPI, Master, set clock rate fck/64
  SPCR = (1<<SPE)|(1<<MSTR)|(1<<SPR1);
#else
  // Enable SPI, Master, set clock rate fck/2
  SPCR = (1<<SPE)|(1<<MSTR);
  SPSR |= (1<<SPI2X);
#endif
When you turn off this compiler directive the SPI master clock setting will use the fastest possible clock fsck/2 (5.5296 MHz), but this clock rate will not work on the ATMega168 SPI slave, it only work on real Microchip MCP23S17 SPI I/O expander; therefore for the ATMega168 SPI slave we use the fck/64 (172.800 KHz) with 11.059200 MHz crystal clock on the AVRJazz Mega168 board.
Now you could enjoy the following video showing all the experiments we’ve done in this tutorial:
The Final Though
Currently the Serial Peripheral Interface (SPI) is lack of the standard specification, its also called de facto standard, rather than one standard protocol specification agreed by the international committee. This lack of the standardization lead to the wide SPI protocol option implemented by various manufactures; for example as shown on the SPI data transfer to the 74HC595 8-bit shift register tutorial above, we use different chip select logical signal to latch the 74HC595 D-Latch register compared to the real SPI slave I/O device such as Microchip MCP23S17.
Nevertheless the SPI is out there; it’s still considered as one of the best and fastest embedded systems serial data transfers available today and it’s supported by most of the IC (integrated circuit) leading manufactures.
Bookmarks and Share


Related Posts
18 Responses to “Using Serial Peripheral Interface (SPI) Master and Slave with Atmel AVR Microcontroller”
Comment by rwb.
Yes you are right, if you see the picture closely you will find that I assign the A2,A1,A0 as 000, 001,010, 011,100,101,110 and 111 respectively.
Comment by newbie999.
RWb,
Thanks for your reply.
Comment by avinash.
Hello,
Very extensive, well written tutorial for SPI Programming. Simply great!
I liked them so much that I linked to your site at once.
You can check it out from here.
http://extremeelectronics.co.in/links/
Comment by firstoption.
Dear Sir,Thank you for this wonderful tutorial.I must say you are a great lecturer.Sir I have question with respect to the first part of this tutorial i.e the interface bitween ATmeag168-the master and the 74HC595-the slave device.Please accept my ignorance,I am new to µC.In the main program,you said we should set PORTD as output(DRD=0xFF).My question is,how did you come about PORTD again,I thought once the slave device recieves data from the master,then it will move it to the shift register which will in turn send it to the output-Qa-Qh of the slave device.So I do not understand this line clearly:PORTD=SPI_WRITEREAD(cnt);
-question-Are we outputing the data from the master through PORTD or through the outputs-Qa-Qh of the slave device.
-in case I want to use the output from the slave device to drive 2-3 DC motors instead of LED you used in this tutorial,am I going to connect the +ve and -ve of the motor to two of the output pins each or only the +ve of the motor to one output pin and the -ve to the ground.I wish to move the motor in the clockwise and anticlcokwise direction.
I am very sorry to bother you with this long story.In anticipation of your positive and quick response,I wish you a blessed day.
Best Regards.
Comment by rwb.
When we send data to the SPI slave device (74HC595), actually at the same time we read data from it.
PORTD=SPI_WriteRead(cnt);
This command will send data (cnt) to the 74HC595 shift register and read data from 74HC595 and store it on PORTD (ATmega168).
In order to change the DC motor direction (CW or CCW) you need to change the voltage polarization of your DC motor. This could be achieved by using the H-Bridge circuit and two output pins. For more information about the H-Bridge circuit you could read my previous posted blog Using Transistor as a Switch.
Comment by firstoption.
Good morning Sir,
Thank you for the quick and detailed response.I woke up this morning to see that you have already replied my question.Thank you for sharing your wisdom other people.I really appreciate your kind gesture.Sir in the SPI protocol,as we write to the slave device,must we also at the same time read from the slave,or it depends on the application.In case we are allowed to write to the slave without reading from it,that mean this line:PORTD=SPI_WriteRead(cnt);
in the main program will not be needed.am I right.
I am very sorry to disturb you again.
Best regards.
Comment by rwb.
Because the SPI protocol use the special circular shift register connection between the SPI master and the SPI slave, therefore while the SPI master is shifting its own data to the SPI slave register, the SPI slave also shift its own data to the SPI master at the same time. Yes, you could choose to ignore the SPI slave data if you just want to send the data as shown on this following code:
SPI_WriteRead(SLAVE_DATA);
Remember the only way to read the SPI slave data is by writing data to it, because the SPI slave device could not initiate its own data transfer. Only the SPI master device could initiate the data transfer to the SPI slave device.
Comment by firstoption.
Sir,thank you once again for your detailed reply.i really appreciate your kind consideration.That is very nice of you.Best regards.
Comment by Mehrdad.Kamelzadeh.
Is that possible to have a single External Crystal for Master and all Slaves? what are advantages & disadvantages of using single crystal for all AND a Crystal for any Micro??
Comment by rwb.
All the SPI Slave clock source could only be supplied by the SPI Master, the SPI Master clock (SCK pin) is supplied and managed by the SPI peripheral inside the AVR ATMega168 Microcontroller.
Comment by 002.
According to the ATmega168 datasheet we have 4 SPI mode, does the SPI master and SPI slave need to have the same mode to able to communicate right?
Comment by rwb.
Yes, the data mode is controlled by Clock Polarity (CPOL) bit and Clock Phase (CPHA) bit in the SPI Control Register (SPCR)
Comment by fuad.
i am a beginner..i want to ask..
how to connected Atmega as master and as slave using RS-485??
can you help me??
thanx…
Comment by rwb.
You simply need to use the UART to RS485 converter such as MAX485 or SP3485 chip and use the ATMega168 UART peripheral to send and receive data.
Comment by fuad.
ok…i’ve made a series of simulated with proteus software…but i don’t know how to programming…
can you helpme…
thank you..
Comment by Murali Nimmala.
Great work done.
Thank’Q’.

Comment by newbie999.
sir,
With the addressable pins configuration feature (A2,A1 and A0), practically you could attach up to 8 of MCP23S17 SPI I/O expander devices which give you 128 I/O ports using just four of your AVR ATMega168 microcontroller’s ports (MOSI, MISO, SCK and SS).
in the diagram below these texts,
those 8 MCP23S17 are not in oder
My question is we can arrange their orders freely
as long as we set A2 A1 and A0 from 0 to 7 right?
Thanks